|
|
Exploring Linux - Part 22
by Alan German
As noted in
the previous article in this series, several of the
backup packages available for Linux are based on the
rsync file synchronization utility.
One such program is Lucky Backup (http://luckybackup.sourceforge.net/). This package lets you create a
backup profile by specifying both the source and the
target locations of the files to be processed. The
resulting backup is a file-by-file copy of the source to
the target disk. This requires a bit more disk space, due
to there being no file compression, but it does make file
retrieval very simple.
Lucky Backup lets you run a simulation so that you can
see what is going to happen without copying any files.
Then, when you run the actual file transfer there
shouldn't be any surprises. But – surprise! While,
on my system, the simulation worked just fine, the actual
file transfer generated dozens of error messages in very
evident red text. Most of these were to the effect that
rsync copy operations were not permitted due to file
ownership (chown) issues. However, the confounding issue
was that the files were actually transferred, and the
backup process did appear to have been successful.
Nevertheless, the production of so many
"errors" did not induce a great deal of
confidence in Lucky Backup, and life is too short to see
if the error messages can be eliminated. So, for me, it
was on to the next backup program.

My ultimate
selection for backup software is Back In Time (https://github.com/bit-team/backintime). This program is available
through the Ubuntu Software Centre and installs itself
with an entry in Applications – System Tools.
Actually, it creates two entries, one to simply run the
program, and another to run the program as root (in order
to process files for which the regular user doesn't have
sufficient permissions). Running the program as a regular
user works just fine for my purposes.
The first time the program is run, the settings dialogue
box is displayed. The initial tab lets you specify the
target drive, the folder where the backup files are to be
stored, and select a schedule for the backup process. If,
like me, you intend to run the backups manually just
leave the default for the scheduled backup as
"Disabled", rather than selecting one of the
timed options (e.g. every 5 minutes, daily, weekly, etc.)
The next two tabs are for specifying the files and
folders to be included in or excluded from the backup. In
my case, I chose to initially include my entire data
partition (/media/DataDisk) and then to exclude certain
files and folders, such as SyncToy*.* (configuration
files for Microsoft's SyncToy utility). Additional
default entries on this list include items such as .*
that will eliminate backing up any hidden files or
folders.
A number of tabs provide further program options,
including the ability to automatically remove backup
files after a given period of time or when disk space
becomes an issue. There are a couple of "expert
options" that the program says to only change
"if you know what you are doing". Needless to
say I gave the latter a wide berth!
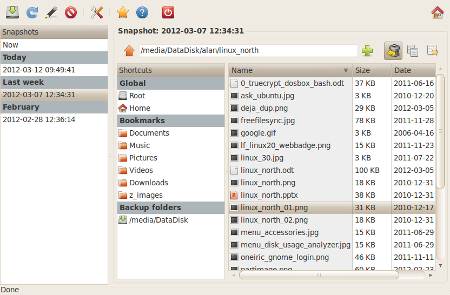
Once the configuration has been set, running the backup
process is as simple as clicking on an icon on the main
menu bar. The program then makes what it terms a
"snapshot". This and subsequent snapshots are
listed by date in a panel on the left side of the
program's window, together with an option to view the
current state of the source disk ("Now").
Clicking on any snapshot causes a listing of the files
and folders that the snapshot contains to be displayed in
the right-hand panel of the program's window in a
tree-directory format.
The
beauty of this layout is that it is easy to browse
through the entire backup, and identify any single file
or folder that needs to be restored. Simply clicking on
the "Restore" icon (a dustbin with a
"return" arrow) causes the selected item to be
restored from the target disk to its original location on
the source. Now, what could be simpler than that?
However, it's also possible to restore an entire
snapshot. In my case, I click on the /media/DataDisk
entry under "Backup folders" and then click on
the "Snapshots" icon in the upper-right corner
of the dialogue box. All of the available snapshots are
now listed. Simply selecting one of the available
snapshots allows me to either compare the backup to the
current disk status, and display any differences, or to
actually restore the backup.
One useful aspect of Back In Time is that it has the
ability to create "hard links" of files within
backups. This is an rsync feature whereby the backup
process stores a link to a file that is already stored on
an existing backup rather than creating a second copy of
the file itself. Intended to save space by eliminating
storage redundancies, the downside to this facility is
that it isn't available when storing backups on FAT
volumes such as (normally) external USB drives.
Perhaps the only real limitation of the program that I
have found to date is the rather sparse documentation
that is included in the software through the help menu.
There is a comprehensive list of the various commands
that are available, but a lack of detail on how to use
some of them. Fortunately, Back In Time is pretty
intuitive when it comes to basic usage, and there are
many tutorials available on the Internet covering various
versions of the program.
Back In Time functions very efficiently and seems to
provide all the features that I need. Consequently, I
think that this one is a "keeper" and, for now
at least, will become my standard application for data
backup under Linux.
For those who remain unconvinced, or who would like more
details of the backup programs mentioned in this and the
previous article, please check out the series of blog
posts on the subject commencing with "Backing up a
step" at: http://linuxnorth.wordpress.com/2012/02/23/backing-up-a-step/.
Bottom Line:
Lucky Backup
http://luckybackup.sourceforge.net/
Back In Time
https://github.com/bit-team/backintime
Originally published: May, 2012
top of page
|
Archived Reviews
A-J
K-Q
R-Z
The opinions expressed in these reviews
do not necessarily represent the views of the
Ottawa PC Users' Group or its members.
|
