|
|
Exploring Linux – Part 12
by Alan German
In the
previous article in this series I gave my first
impressions of Version 8.10 of Ubuntu Linux. I have now
been using this distro for several months and have
resolved all of my initial concerns. I have also found
some great tips and techniques for making the package
more useful. So, it's time to share my findings with all
of you...
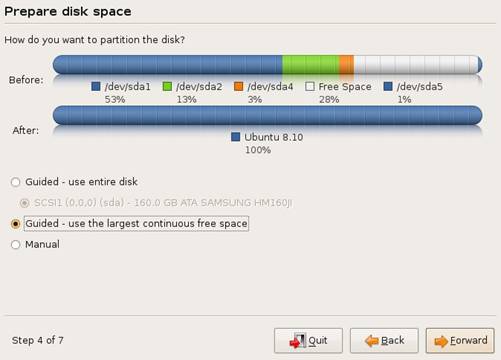
Firstly, as advertised, Ubuntu 8.10 has a shiny new disk
partitioner, with a brightly-coloured graphical display.
But, in certain situations, the display seems to suggest
something different than what is desired. In particular,
the partitioner can suggest a default installation using
the entire hard drive, which may not be what the end user
wants. But, clicking on “Guided – use largest
continuous free space”, doesn’t change the
“After” display, so that it still looks like
the partitioner will use 100% of the available hard drive
(see figure). Not to worry, the partitioner does indeed
set up the Linux ext3 and swap partitions in the free
space on the disk. These designations are confirmed on
the final “Ready to install” screen before the
installation commences. Still, hopefully someone will
have marked this strange behaviour for updating in the
up-coming 9.04 release.
I have been modifying – read
deleting – some of the disk partitions on my hard
drive for various purposes. As usual (!), this has
resulted in my destroying the master boot record (MBR)
and making the computer unable to boot – with the
infamous GRUB Error 22. My normal practice has been to
reload a backup disk image but, this time, I decided to
try to learn a bit more about GRUB, and how I might fix
the problem more directly. A Google search identified the
“Super Grub Disk” that promised to restore the
MBR, but also to provide “...a teaching tool to help
you learn more about bootloaders...” The automatic
restoration process worked so well, I haven't yet got
around to learning about GRUB, but my Linux system now
once again boots perfectly!
The Super Grub Disk (http://stmaarten.globat.com/~supergrubdisk.org/) provides a bootable CD that can
be used to fix boot-up problems. The “Choose
Language and HELP” menu option provides basic
instructions on how to use the Super Grub Disk (SGD). The
display format is a little strange. Rather than just
providing a help file, the program's authors seem to have
chosen to display a text file with a “more”
option. As a result, the information flows onto the
screen in chunks, making it hard to know where you left
off on the previous page. But, if you bear with the
output, the necessary information is available.
Basically, there are just two steps – choose the
Gnu/Linux option from the first menu, and Fix Boot of
GNU/Linux (GRUB) on the second menu. The next screen
allows a selection from all of the existing Linux
installations. In my case, there was just a single choice
– 4 hda4 sda4 (hd0,3) Ubuntu 8.10 – so the
selection wasn't too difficult! Seconds later there was a
message that “SGD has succeeded” and an
indication to reboot the computer. Performing a normal
reboot of the computer shows that the program had indeed
done its job. Quite remarkable!
Another minor complaint I had about the initial release
of Ubuntu 8.10 was that it came with OpenOffice 2.4
rather than the more current Version 3.0 of the latter.
Unfortunately, the Ubuntu developers didn't have time to
thoroughly test the new version of OpenOffice for the
Imperial Ibex distro, and so opted to include the earlier
release. But, fortunately, some OpenOffice users, the
"OpenOffice.org Scribblers" team, have
developed a personal package archive (PPA) that allows
OpenOffice 3.0 to be easily added to Ubuntu 8.10. The
follow-the-bouncing-ball instructions are posted at: http://news.softpedia.com/news/How-To-Install-OpenOffice-org-3-0-in-Ubuntu-8-10-96449.shtml. The process requires just a few
steps. First you need to add the OpenOffice.org 3.0
repositories to your Software Sources options and then
add an authentication key. Finally, you are presented
with the option to update OpenOffice to Version 3 which
then proceeds automatically.
The success in finding a way to easily upgrade the copy
of OpenOffice on my Linux system, spurred me on to try to
solve another irritant with the program. I use a
dual-boot, Linux-Vista, system on my computer, largely
because I have a couple of Windows' programs that I use
regularly. In one case, it's an HTML editor that I like
using and haven't found a Linux equivalent that works as
well, The other program is a GPS mapping program that has
no Linux equivalent. The consequence of using both
operating systems is that I also run both the Linux and
Windows' version of OpenOffice. While, generally, the two
versions are quite compatible, there is a minor problem
in that the Linux program uses different fonts than the
Windows' version. In particular, my Linux OpenOffice
doesn't have access to the Times New Roman and Comic Sans
MS fonts and, consequently, certain documents don't
display nor print in precisely the desired manner under
Linux.
So, I wondered if I could install additional fonts into
the Linux version of OpenOffice, and if there were
equivalents for my favourite fonts under Windows. Well,
the answers were yes, and more-or-less yes. Even more
surprising, not only could I find fonts that would do
what I wanted, I could actually use the specific
Microsoft fonts! All that is necessary is to install the
“Microsoft fonts (msttcorefonts)” package using
the “sudo apt-get install msttcorefonts”
command in a terminal window. The Linux version of
OpenOffice then has access to a number of Microsoft fonts
including: Arial, Comic Sans MS, Courier, Times New
Roman, and Webdings. And, as a result, my documents now
look the same in either Linux or Windows!
Information provided on the Internet suggests that
“msttcorefonts has an amusing history”. If the
details are accurate, this is certainly the case. The
story goes as follows: “Microsoft licensed the fonts
for anyone to freely use (regardless of OS) to help boost
the market share of IE. When they won the first browser
wars, they removed the files from their site… but
the license says you can freely redistribute them so
that’s how we can legally use them :)”
The final glitches I mentioned previously related to
Version 2.6 of The GIMP that came with Ubuntu 8.10.
Firstly, the Acquire menu option, used to grab screen
images and to drive my scanner, had completely
disappeared. A little searching through the menu
structures of the program revealed that these options can
now be found under File – Create – Screenshot
(or Xsane for the scanner). The second
“feature” that I wasn't keen on was that the
two GIMP toolbars were docked (fixed) on the left and
right sides of the screen. It turns out that you can
change this default behaviour, and produce the earlier
floating windows. However, the procedure is not very
intuitive. You need to go to Edit – Preferences
– Window Management and change the options for both
“Hint for the toolbar” and “Hint for other
docks” from “Utility Window” to
“Normal Window”. Strange, but true!
Bottom Line:
Ubuntu 8.10, Canonical
Ltd.
http://www.ubuntu.com/
Super Grub Disk
http://stmaarten.globat.com/~supergrubdisk.org/
How to Install OpenOffice.org 3.0 on Ubuntu 8.10
http://news.softpedia.com/news/How-To-Install-OpenOffice-org-3-0-in-Ubuntu-8-10-96449.shtml
Possible to install Times New Roman?
http://ubuntuforums.org/archive/index.php/t-589588.html
GIMP 2.6 - GNU Image Manipulation Program
http://www.gimp.org/
Originally published: April, 2009
top of page
|
Archived Reviews
A-J
K-Q
R-Z
The opinions expressed in these reviews
do not necessarily represent the views of the
Ottawa PC Users' Group or its members.
|
