When
VCW VicMan's Photo Editor starts for the first time, you
have the option to watch 3 different animated tutorials
written in Java. One of them is on the photo editor
basics, one on retouching images and the last one on the
power of cloning. The speed of the video is a bit
troublesome, so I soon stopped it and used the step
button instead to adjust the speed to my liking, but it
meant that I lost some animation such as the red blinking
circle around the object of the demonstration.
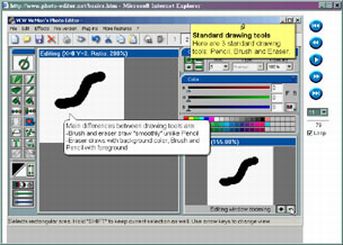
The
program has a panel of buttons to the left, including a
pencil and a brush (same as the pencil but with
anti-aliasing) to draw lines, an eraser, and an
eyedropper to select a colour from a colour chart or from
the picture itself. The next 4 buttons are used to
replace one colour with another in various ways, for
example one can replace the colour of an object with the
selected foreground colour, and adjust the colour
tolerance in real time (click on "live") until
you get the full contour of the object.
The
next 4 buttons let you select an area, either
rectangular, free hand shaped or based on a colour range
and make the editing to only that area, which is very
convenient when objects that you want to protect are
close.
You
can add text but the options are limited and cannot
adjust the look while viewing the text with the picture.
Included are also gamma correction, contrast, automatic
colour correction, and more, but no red eye correction.
The package also has a number of filters like noise
reduction, blur, emboss, and some more artistic ones
called the Sapphire collection, with some interesting
results but often hard to predict.
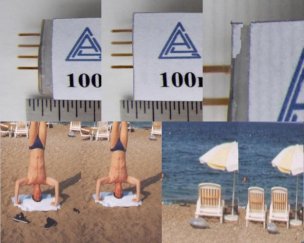
One
of the best features available in the Pro version is the
clone tool; it allows you to do a surprising number of
things on a picture including removing defects,
duplicating objects, moving edges, etc. The way it works
is quite simple. You first select a source area and a
destination area, you then move the cursor where you want
to copy the source area. The area can be a square, a
circle or a line, each with a size of 1 to 51 pixels and
with an opacity of 0 to 100%.
For
example, in the first picture I extended the label by
selecting an area near the edge of the label and
"painted" the area where I wanted the new edge
to appear. To make the white area blend nicely I selected
an opacity of 30% and gradually melded the two areas, for
the pins I selected 100% opacity and a small area. The
same technique can also be used to delete unwanted
objects like the shoes or add a chair as shown in the
edited beach picture.
There
are a few things I would like to see in Vicman's Photo
Editor. For example, it does not support the mouse wheel
nor can it maximize the edit window, which makes the
modification of large pictures more arduous than needed.
It has a very convenient 5 levels undo, but it's missing
the redo in case you went too far. When selecting the
"save as" for the first time, you have the
option to select the quality factor, but as far as I can
tell there is no way to change it afterward. Finally it
has multiple floating option windows that change
depending on the context and can be moved wherever you
want, but their sizes are all different, so they use up a
lot of real estate on your screen.
Overall,
VCW Vicman's Photo Editor is fairly easy to use with some
powerful features, but it still lacks some maturity to be
a serious competitor to other well known programs, though
for it's price, free for the regular version and $42.87
for the pro version, it is an interesting option.
To install the
latest version of VCW Vicman's Photo Editor, go to http://www.vicman.net/soft/phedinst.exe
and accept to install it.
For more info
check http://www.vicman.net/vcwphoto/index.htm.
Bottom Line:
VCW Vicman's Photo Editor
Free for regular version - $42.87 for the pro version<
Vicman
http://www.vicman.net/vcwphoto/index.htm
Originally published: June, 2004


