|
|
Wipe Out Old Data
by Alan German
The
club’s monthly meeting in June will feature our
annual E-waste event, providing all members with the
opportunity to dispose of any unwanted electronic
equipment in an environmentally-friendly manner. Perhaps
you, a friend, or a relative have an old computer that is
no longer useful and you would like to send it for
recycling. However, maybe you are hesitating because the
hard drive contains files with personal information.
The recycler will physically shred the hardware,
including the hard drive, which will render the data
irrecoverable. But, perhaps you have lingering doubts
that someone will be able to access your sensitive files
before the disk is destroyed. If so, you need to securely
erase the files or the entire hard drive before you hand
over the computer for recycling. This can readily be
achieved through the use of appropriate software. But,
before we delve into some suitable programs, let’s
take a simplified look at how files are stored on a hard
disk, and how we can make sure that they are completely
erased.
A conventional hard disk has one or more magnetic
platters on which data are stored. The disk manufacturer
performs a low-level format which splits the storage area
into many circular bands or tracks, each of which is
further broken up into individual disk sectors. Depending
on its size, a specific file may be stored in a single
disk sector, or may occupy several disk sectors. The
Windows operating system keeps track of the location(s)
of each file using file pointers. Older versions of
Windows typically use the FAT file system in which the
file information is stored in a File Allocation Table.
FAT systems are still in use, primarily for devices such
as USB memory sticks. More recent versions of Windows use
the New Technology File System (NTFS) and store file
information in a Master File Table.
When you delete a file in Windows, it isn't actually
erased. First, the file is moved to the Recycle Bin and
the operating system updates the file pointers to reflect
the file's changed location. If you delete the file from
the Recycle Bin, it still isn't erased. The operating
system merely marks the space allocated to the file as
being available for future use in storing other files.
The Recycle Bin acts as a sort of fail-safe mechanism
whereby you can easily restore a “deleted” file
in a situation where the deletion was unintended. But,
even if the file is removed from the Recycle Bin, because
it is only “marked” for deletion, the file's
data are still present on the hard drive, and special
recovery software can still restore the file, providing
that the data have not yet been overwritten.
So, there's the source of concern. You can delete your
sensitive files, but you have no guarantee that the files
cannot be recovered. Clearly you need to make sure that
the actual contents of the deleted files have been
destroyed. You need to “securely erase” such
deleted files, or perhaps even erase – or wipe
– the entire contents of the hard drive to make sure
that none of your personal information can be read.
The trick for completely erasing a file is to overwrite
the “free” space that is still occupied by the
data for a deleted file with other information. For
example, all of the bits occupied by the file's data
could be overwritten with zeros. However, some
sophisticated techniques can still restore so-called
“weakly-deleted” files by reading patterns that
remain in the magnetic media even after a file has
nominally been overwritten. Most file-shredding and
disk-wiping software offer multiple methods for
overwriting a disk's free space. These generally consist
of multiple passes to overwrite the free space, often
using random data, in order to minimize or even eliminate
any possibility of data recovery.
Obviously, the more passes that are made, the longer it
takes to wipe the free space. The option selected will
depend on the size of the free space, or of the disk
being wiped, and the degree of security that you as the
end user wish to implement. However, bear in mind that
data recovery on a disk that has been wiped by even a
rudimentary algorithm is a non-trivial task. No doubt
government spooks will be able to recover the data, but
it's unlikely that mere mortals will be able to do so.
Also, you need to consider what's the possibility of
anyone trying to recover any information before the hard
disk hits the shredder.
The good news is that you don't need to do very much to
securely erase deleted files or completely wipe an entire
drive. There is lots of software available that will
accomplish these tasks. A Google search for “secure
erase” or “wipe disk” will provide links
to dozens of candidate programs. My preference is always
for free software, and there are several such offerings
for file shredding/disk-wiping programs.
There are two considerations for these operations. If you
simply want to securely erase the free space on a hard
disk, which will include files that are marked for
deletion, you can install file-shredding software onto
the hard drive and run the program from Windows. However,
if you want to wipe an entire drive that is running
Windows, you can't do this from the Windows drive itself.
Clearly, you can't use a Windows utility program to
delete all the files on the disk running the operating
system. This would require deleting both the disk-wiping
program and Windows while both are running! To accomplish
this task, you need to use a stand-alone, bootable disk
that contains the disk-wiping software.
Firstly, let's consider how to shred the free space on an
operating disk drive. I have previously indicated one
freeware program that will perform this task
(http://www.opcug.ca/Reviews/FileShredder.htm).
File Shredder is currently at Version 2.5 and is released
under the GNU/GPL General Public License. Once installed,
File Shredder allows you to specify one or more files or
folders to be shredded. Alternatively, you can shred the
free disk space across an entire disk volume. Another
option is to remove all the files from a disk drive. The
latter operation is most useful for wiping external
drives, such as a USB memory stick, or a standard hard
drive installed in an external USB disk enclosure. You
are given a choice of shredding algorithm. File Shredder
offers five different algorithms, commencing with a
single pass, up to the use of the Guttman algorithm using
35 passes – which is probably overkill for most of
us!

If we want to securely erase an entire disk drive we have
a couple of options. We could remove the hard drive from
the old computer and plug it into a disk enclosure. The
disk enclosure is then connected to a second Windows
computer through its USB interface. Software, such as
File Shredder, can then be used to remove all the files
and folders on the external drive. However, it may well
be easier to erase the hard drive in place in the old
computer. This requires using specialist software
installed on a bootable CD/DVD or USB drive. Obviously,
the choice of bootable media will depend on what disk
formats are supported by the target computer’s
hardware.
One freeware option that can be used for this purpose is
HDShredder. The download includes an ISO file which can
burnt to a CD, DVD, or a USB drive. The resulting disk is
dedicated to the shredding process such that, when
booted, the computer runs the HDShredder program
directly. A user-friendly graphical user interface
provides a series of screens guiding the user through the
steps required to specify which disk is to be wiped and
which method is to be used.
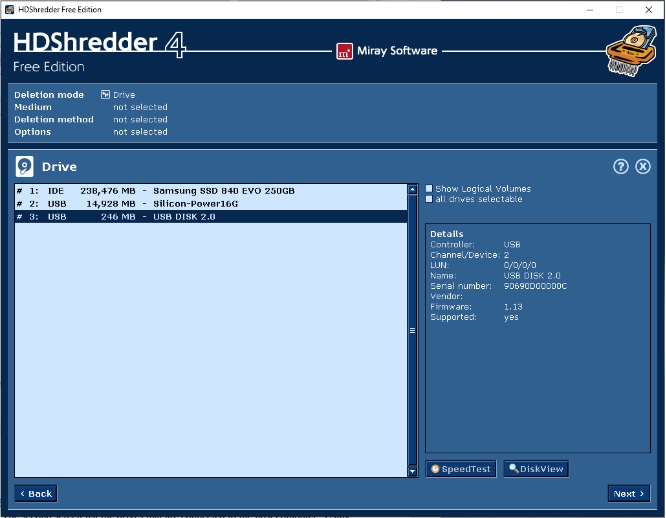
The initial screen allows the user to select if a disk or
a disk partition is to be erased. Since we are erasing
the entire drive, we simply retain the default option to
erase a disk. The second screen list the drives that are
connected to the host computer. Using the mouse, or the
up and down arrow keys, the specific disk to be erased
can be selected. The next screen offers a choice of
methods, nominally including automatic, standards, and
user-defined. The automatic process is the only one
supported by the free version of HDShredder and is
selected by default. Further options are to use fast (1
pass), medium (3 passes), or high security (7 passes).
The subsequent options screen activates or disables items
such as cached and shared memory which the help file
suggests should be left enabled unless any problems
occur.
The final screen provides a control button to start the
disk wiping operation. Pressing this button brings up a
dialogue box warning that the contents of the selected
disk will be completely erased. Pressing the Start
Deleting button brings up a progress bar and some
statistics, including the percentage complete and the run
time. At the end of the process a pop-up window provides
a final report indicating the drive’s name, the
method and number of passes used, the number of deleted
sectors, any write errors, and the total run time.
The free
version of HDShredder is limited to the use of the
so-called “write zero” method of erasure. A
zero value is written to each bit of data on the drive,
thus over-writing any data that was previously present.
As noted, for additional security, the over-writing
process can be repeated multiple times, using either 3 or
7 passes.
The relatively simple method adopted by the free version
of HDShredder should be acceptable for most users. Anyone
wishing to use HDShredder, but requiring additional
security, would need to use one of the commercial
versions of the software that activate up to 15
additional algorithms for disk erasure, plus the option
for a user-defined protocol. An alternative would be to
use a different freeware program such as Darik's Boot and
Nuke (DBAN). The user interface for DBAN is somewhat less
sleek than that of HDShredder, but the disk wiping
algorithms are much more powerful.
Clearly. more complex erasure techniques, especially
those involving multiple passes, require additional run
time. Even a single pass on a relatively large hard drive
will take considerable time. The disk wiping process is
not going to be a five-minute job. The reason that files
are typically marked for deletion rather than actually
erased is that changing a few bytes in the file system to
note that the space previously occupied by the files is
available for reuse is much faster than zeroing every
byte of data occupied by the files. Erasing an entire
disk can mean writing zeros to literally billions of
bytes. Even at the data transfer rates use by computers
this process is still time consuming. Secure disk erasure
is therefore best achieved by using a set-it and
forget-it method. Set up the process to blank the disk,
start the software, and then leave the computer to do its
magic.
My final words of wisdom on the topic of file shredding
– and especially for disk wiping – are to
carefully check the files, folders, or disk that you have
marked to be wiped, before hitting the Start button. The
whole purpose of the software is to completely destroy
the contents of the items selected. Obviously, if such
programs do their job (and they do!) you won’t be
able to recover any data that you mistakenly flagged for
erasure.
You can use the techniques described here before you sell
or recycle an old computer. The good news is that any
recipient of the machine with the wiped hard drive
won’t be able to recover any data. At least, that
will be the case unless the recipient is a government
spook. So, just don’t sell your old computer to a
government spook!
Bottom Line:
File Shredder (Freeware)
Version 2.5
http://www.fileshredder.org/
HDShredder (Freeware)
Version 4
Miray Software
https://www.miray.de/products/applications/hdshredder.html>
Originally published: May, 2016
top of page
|
Archived Reviews
A-J
K-Q
R-Z
The opinions expressed in these reviews
do not necessarily represent the views of the
Ottawa PC Users' Group or its members.
|
