|
|
Copying vinyl to CD for less than five bucks – Part II
by Alan German
Last
time, we recorded a long-playing vinyl record and created
a WAV file. Did you notice it was somewhere around
300-500 MB? Hopefully you didn't since that would mean
you have lots of disk space available. You are going to
need some of this free space because we are now going to
edit the file and split it up into the individual tracks
from the record. This means we will more or less double
the disk space requirements because effectively we will
have two sets of WAV files containing the same music.
Still, disk space is cheap these days, isn't it?
So, let's fire up Wave Repair once more. Select: File
– Open – and the WAV file you recorded in the
last session. That waveform sure looks complex doesn't
it? But, help is at hand. Wave Repair has a neat feature
that automatically scans the waveform and finds the
"gaps" between the music tracks. So, select Cue
Points – Find Tracks and let 'er rip.
As the program scans through the file, the break points
(cue points) between tracks are marked as coloured
vertical lines. At the end of the process, the cue points
are labeled with the track number (T2.1, T3.1, etc.) and
an information box will pop up with a message along the
lines of "12 possible track boundaries
detected".
While the program does its best to identify the quiet
areas between tracks, it can be fooled if there is a
lead-in section of music followed by a quiet bridge to
the main theme. So, it's a good idea at this point to
check the track boundaries manually. With Wave Repair
it's possible to delete extraneous cue points and/or add
new ones as necessary.
To accomplish this task, it's useful to expand the scale
of the waveform by zooming in (View – Zoom In)
until, for popular music, full scale across the screen is
around 6-7 minutes of music. Note that some of the menu
icons allow easy access to the zoom functions (e.g. the
magnifying glass with the plus sign is zoom-in).
Now, using the mouse, click on the waveform a little to
the left of the first cue point and drag the mouse a
little to the right of the same cue point. Press play to
listen to the selected section of music and check that
the cue point is indeed marking the boundary between the
first and second tracks.
As an example of the need to further refine the track
boundaries, take a look at Figure 1. Wave Repair has
correctly identified T8.1 as the cue point for the
beginning of a new track; however, it has also marked cue
points at T9.1 through T13.1, all in rather quick
succession. Listening to the marked sound clip, the
problem becomes evident, the lead into the piece is a
piano solo, with sequences of notes being followed by
pianissimo sections and brief pauses. Wave Repair thinks
that each period of "quiet" is the start of a
new track. In fact, the introduction runs from T8.1
through T12.1 and the vocal solo comes in about half way
between T12.1 and T13.1. Consequently, we need to clean
up the track by deleting some of the erroneous cue
points.
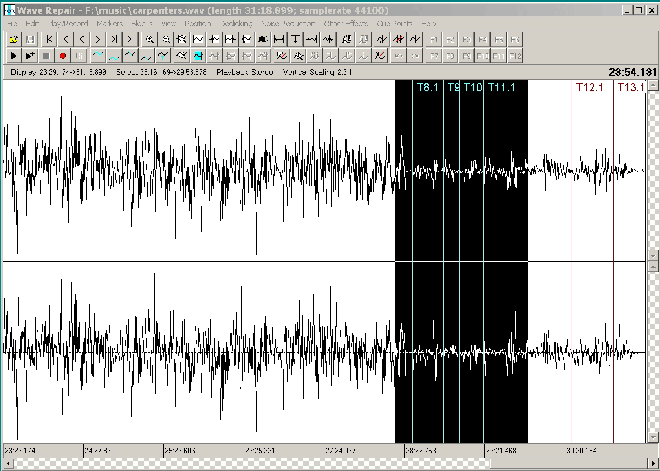
Figure 1.
Once again, drag the mouse across the waveform, this time
starting just before T9.1 and ending just after this cue
point. Play the sound clip if you wish just to be sure
that this truly is part of the current track. If you are
satisfied, select Cue Points – Delete Cue Point and
T9.1 will magically disappear from the marked section of
the waveform. However, note that the subsequent cue
points have all been renumbered so that the old T10.1 is
now T9.1, etc. Continue deleting cue points until you
find the real start of the next music track.
In the event that Wave Repair misses a valid track
boundary, you can click the mouse at the desired point
along the waveform and select Cue Points – Add Cue
Point to set your own selection for the start of a track.
Now that we have cleaned up the entire waveform and have
all the desired cue points marked, we are ready to create
individual WAV files for the tracks from our record.
Select: Cue Points – Split Tracks. In the pop-up
box, enter a base filename to produce a series of WAV
files with this name and a series of sequential numbers
(e.g. a base filename of beatles.wav produces files named
beatles01.wav, beatles02.wav, etc.) A second pop-up box
may indicate that the "WAV file is not an exact
multiple of CD blocks. Do you want the last track padded
with zeros?". Say yes to this prompt (what else
would you say?) and the program scans through the
waveform, providing a running commentary on the
individual WAV files that are being created.
At the end of the process, we will have our original 360
MB WAV file and eight individual WAV files, each being
30-60 MB. See why we need lots of disk space?
Actually, it's not all doom and gloom. We are not going
to fill the hard drive with WAV files of all our LP's.
The next step is to burn the individual music files to a
CD-R and, once we have a working CD, we can delete the
intermediate WAV files, and free up the space to record
and process the music from another LP.
Now, it's crunch time. Can we continue with the process
of making our music CD-ROM for less than five bucks?
After all, we've already spent the cash on the cable used
in Part I to connect the output of our sound system to
the input of our computer's sound card, and we don't have
much change for burning software. Clive Backham, the
author of Wave Repair, recommends using CDRWIN (Golden
Hawk Technology), a shareware program to control burning
the individual music tracks to a CD. My problem with this
software is that it's not very intuitive. One needs to
learn how to write a "cuesheet file" that
defines all of the files to be recorded and the starting
time of each track/index. While this may be a relatively
easy process, in my view, life is too short when simpler
solutions are readily at hand.
Everyone has CD burning software. It came bundled with
your CD drive. So, you don't need to spend another dime.
Just make use of the software that you already have
available. In my case, I have Roxio's Easy CD Creator
and, for the purposes of this article, I will use Version
5.2 which did come as bundled software with a CD burner.
The "trick" to creating a useful CD is to run
Easy CD Creator and, from the main menu, select Project
– Make a music CD (not a data CD!). In the
Explorer-type top window, navigate to the directory
containing the individual WAV files, select all these
files (e.g. beatles01.wav through beatles08.wav), and
press the Add button on the Music CD Project bar. The
status bar at the foot of the lower window now indicates
the individual tracks selected, the disk space on the CD
that will be used, the total recording time, and the disk
space and time still available. Note that it is often
possible to record all the tracks from two LP's onto a
single CD by extending the above-noted process.
Alternatively, you can create compilation CD's of your
favourite pieces of music recorded from a variety of
sources.
The other "trick" is to press the Record button
and check the Options, making sure that Disk at Once is
selected. This will ensure that Easy CD Creator will
write the individual music tracks as CDA files, and will
close the CD once the burning process is complete. In
turn, this will mean that you will be able to play the CD
in a regular audio CD player rather than only from a CD
drive in a computer.
So be brave, set things up, press the red Record button,
make sure the right options are selected for the burn,
press Start Recording, and sit back as Easy CD Creator
easily creates your brand new music CD.
You should now find that all your hard work – and
your five bucks – have paid off. You should have a
shiny CD-ROM containing a copy of your favourite LP
record(s). Note that we haven't done anything terribly
fancy to get to this point; we took a very basic approach
primarily to prove the methodology. In the next and
probably final part of this series, we will see what
happens if we spend a few more dollars on the system to
purchase the "platinum version" of Easy CD
Creator. We should find that the extra cost software
provides vastly superior processing capabilities and
makes our life easier to boot. Now, that's worth
exploring…
Bottom Line:
Wave Repair, Version 4.8.2 (Freeware/Shareware - depending on level of use)
(Latest release is Version 4.8.7)
http://www.delback.co.uk/wavrep/
CDRWIN (Shareware)
Golden Hawk Technology, Merrimack, NH
http://www.goldenhawk.com
Easy CD Creator (Proprietary - now Easy Media Creator 7)
Roxio, Inc.
http://www.roxio.com
Originally published: June, 2005
top of page
|
Archived Reviews
A-J
K-Q
R-Z
The opinions expressed in these reviews
do not necessarily represent the views of the
Ottawa PC Users' Group or its members.
|
