|
|
Copying vinyl to CD for (one hundred and)
five bucks – Part III
by Alan German
Did
you notice the slight shift of emphasis in the
title? Our costs seem to have jumped by $100.
This results from the purchase of Easy Media
Creator 7 [or now Creator 7.5 - see the side bar
at right] in order that we can make use of Sound
Editor and the CD-burning capability included in
the package. Of course, you may already own a
full version of this package (perhaps you were
the winner of one of our raffles in April and
May!) in which case your cost remains at $5 for
the Y-adapter cable (see Part I of this series in
the May 2005 issue of Ottawa PC News).
Indeed, you may wish to refresh your memory on
the story so far. In this third part of the
series, we will assume that your computer is
hooked up to your stereo system so that you can
record music from an LP record of your choice
(Part I). The techniques we will adopt to record
and burn tracks to a CD-ROM are similar to those
detailed previously (Part II). However, in this
session, we will be using a one-stop solution to
recording and burning the music. This should make
our lives easier, but let's wait and see.
With Easy Media Creator 7 installed and running,
we need to select Sound Editor from the Tools'
menu. If you tried Wave Repair, as described in
the earlier articles, the main screen of Sound
Editor (see Figure 1) will look fairly familiar.
Once again, we have a split window with the upper
and lower halves ready and waiting to receive the
left and right channels of our recording.
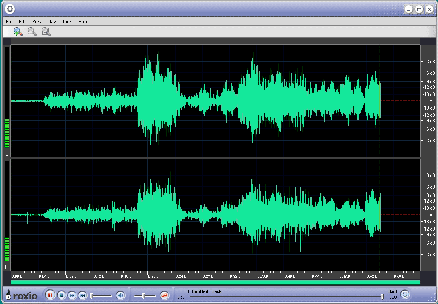
Figure 1. Sound Editor's work space
A tool bar at the bottom of the window has a
microphone icon. Clicking on this icon lights up
the microphone in red, and enables monitoring of
the recording. With our LP record playing, a
slider allows the sound input level to be
adjusted. The levels are monitored as a series of
green, yellow and red bars to the left of the
waveform windows. Once we have set an appropriate
recording level, pressing the big red Record
button starts the recording process.
At the end of side one of the record, pressing
the red button again (it's now showing two
vertical red bars) provides a pause in the
action. Flip the record to side two and repeat
the recording process to capture the entire LP.
Now, press the Stop button and prepare to save
the recording to a disk file.
But, you may have to be patient. The help file
tells you to save the file immediately; however,
the save command may not be immediately
available. The program has to save a temporary
file to disk. This process is no doubt highly
dependent on the speed of one's hardware. In my
case, it took a while but there was no indication
from the program as to what was going on. The
disk activity gave a clue, and a little exploring
showed that indeed a temporary file was being
created.
Once control is returned, you do wish to select
File - Save, choose a file name, probably leave
all the options at their default values, and
press the Save button to retain the recording in
a directory and file name of your choice.
Sound Editor provides a variety of options for
cleaning up the recording, including the facility
to remove clicks and crackle. (Not that you will
need to do this. You took good care of your LP's
when you were a teenager - didn't you?) Figure 2
shows a section of music where a single spike
results in a distinct click on the soundtrack. To
eliminate such noise, we drag the mouse across
the click to highlight the section of the music.
Then we select Tools - Apply Effect to Selection
- Declick. This menu provides sliders for the
level of "declicking" and
"decrackling". Set the sliders to an
appropriate level (100% may well do) and press
OK. After the progress bar indicates completion
of the task, the selected waveform will show the
results of the processing. Note the difference
between the before and after waveforms in our
example. Other useful options can be found under
the Edit menu, including commands to delete a
selection of the waveform, and to eliminate
leading and trailing silences.
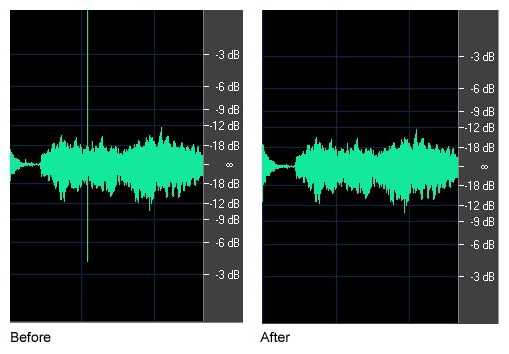
Figure 2. Effect of declick and decrackle
If you are feeling really creative, you can apply
other effects to the recording such as giving it
the properties of having been recorded in a
church with options for reverberation times and
echo level. If you feel completely wild, you can
give the music a robotic effect and change its
character entirely.
Once you have the recording in its final state of
clarity, it's time to break out the individual
tracks. Sound Editor is very competent at this
task. Select - Tools - Auto Locate Tracks, and
the program will scan the waveform for the
inter-track silences, placing blue markers ahead
of each track. You can manually check any given
marker by selecting a portion of the waveform
that includes the marker and playing the
selection. If the marker is not required, right
click on it and select Delete Track Break.
Alternatively, to add a marker, click on the
waveform at the desired location, which will
produce a vertical yellow line, and select Tools
- Insert Track Break.
With all the tracks properly identified, it
should be time to select File - Save All Tracks.
But, take note of the titles of the individual
tracks. Track 1 has the name of the original WAV
file (such as benny_goodman.wav), while
the subsequent tracks are titled 2 - Untitled
Track, 3 - Untitled Track, etc. If
you save the individual tracks at this point, you
will have the option of overwriting the entire
file with just Track 1, and additionally creating
a bunch of files as numbered "untitled
tracks".
Personally, I don't find this to be an
appropriate course of action. The default is to
lose the complete WAV file, which we might wish
to refer to if it transpires that we have made
any bad choices in processing the individual
tracks. Furthermore, we will also end up with a
bunch of files with rather meaningless names. The
help file suggests renaming the tracks
individually. If you want to have individual
tracks named with the title of the tune then this
will work just fine. My typical modus operandi is
to stick the CD into the drive, press play, and
listen to the entire disk. Consequently, for me,
giving each track in the series a unique name is
overly tedious.
There is also a particular problem with the
default naming scheme when it comes time to burn
the tracks to the CD. 10-Untitled Track
will come before 2-Untitled Track, and
so on, in the play list. My work-around was to
rename the first track as benny_goodman_01
and then save all the tracks with their default
titles. I recalled that ACDSee, in addition to
managing digital image files (see
http://opcug/ca/Reviews/acdsee7.htm),
can also deal with
audio files. So, it's a simple matter to line up
the ten or so tracks in the directory with benny_goodman_01.wav
as the first file, followed by 2 - Untitled
Track and the rest of its siblings. ACDSee's
Edit - Batch Rename command then makes creating a
series of files with relatively meaningful, and
ordered, names a snap.
Now it's time to burn our CD. In the Music
section of Easy Media Creator's main menu we need
to select Create New Audio CD. The resulting
screen will be familiar to those who have
previously burnt CD's. Navigate through the
Select Source window, and highlight the desired
tracks. Press the green arrow on the menu bar of
the Audio CD Project window to copy the selected
tracks into the project.
It's worth noting that, by default, the tracks
are ordered alphabetically (hence the desire to
name the tracks 01, 02… etc.); however,
individual tracks can be dragged up or down the
list so that the play list can be tailored to
your specific wishes. This is especially handy if
you are burning tracks from two LP's to a single
CD, but the second LP's title, and hence the
filenames of its tracks, come ahead of those of
the first LP. To change the order, select all the
files for the second LP, at the top of the
project list, and drag them as a group below the
last track from the first LP.
Once you have all the desired tracks in place,
check the status bar at the bottom of the window.
This will give you disk size of your blank CD,
the total recording time for the project, and the
free time available on the disk. A set of
numbered boxes represents the individual tracks.
These run across the status bar, illustrating how
they will span across the CD. A pop-up window
indicates if the selected files won't fit onto
the CD.
Finally, press the Burn button, followed by the
Details button in order to check the options set
for the burning process. Make sure that Record
Methods is set to Read-only Disc. This will
ensure that the resulting CD will be closed so
that it can be played on any CD recorder. You can
probably leave all the other settings at their
default values. At least, that's always my
preference - until something doesn't work!
Easy Media Creator 7 offers other options for
customizing your music CD's. CD TEXT allows you
to store information like the title of the disk,
the artist's name, and the titles of the
individual tracks on the CD, provided this
feature is supported by your burner. The textual
information will then be displayed on electronic
devices that support CD TEXT. In addition, rather
than maintaining the tracks as WAV files, you can
convert and burn them as MP3's. And, with Label
Creator, you can produce colourful labels, jewel
case inserts, and descriptive booklets.
In my view, Creator 7 provides almost one-stop
shopping for copying vinyl to CD, except for the
somewhat awkward track naming convention. It's
certainly a very convenient package for recording
music, editing the resulting waveforms, and
burning the sound files to CD.
Bottom Line:
Easy Media Creator 7
$99 (Proprietary)
Roxio, a division of Sonic Solutions
http://www.roxio.com
Originally published: September, 2005
top of page
|
Archived Reviews
A-J
K-Q
R-Z
The opinions expressed in these reviews
do not necessarily represent the views of the
Ottawa PC Users' Group or its members.
Easy Media Creator 7.5
Roxio is now part of Sonic Solutions and the
latter have brought some of their expertise in
sound recording to the package. In particular,
Creator 7.5 now features an "LP and Tape
Assistant", a sort of wizard that leads you
through the recording process. The package has an
excellent help file, with exceptionally clear
graphics, on setting up the connection between a
sound system and a computer. The recording
process is similar to that described in the main
article, with some minor differences in the
details. The program will now automatically
adjust the sound level prior to making a
recording. It also features a mixing board for
processing multiple tracks into a single
recording. The LP and Tape Assistant wizard
effectively integrates the recording and burning
procedures to provide a complete solution to
copying vinyl to CD.
|
|
