|
|
Image is Everything
by Alan German
Have you made a compete
backup of your system lately? What about the disk
partition containing all your data files? Perhaps
just a copy of the really important stuff? If,
like most computer users, you answered no to any
(or all) of the above, perhaps it's time that you
considered investing in a disk imaging program.
And, if you need such a utility, you need one
that will make a true image - like Acronis True
Image Home 2009.
Perhaps you don't consider disk backups to be
very important. After all, your hard drive has
been working just fine for years, hasn't it? But,
have you considered that the disk will fail or
become corrupt at some point? What then? Are you
going to spend hours re-installing your operating
system, and its multitude of patches? Will you
have to re-install all of your applications
individually, and try to recall all of your
customized settings? If you have any programs
that require activation, are you going to have to
spend a lot of time on the phone convincing the
help desk that you really have had a disk crash
and need to reactivate the software? And, if you
lose your important data files in a hard disk
crash - guess what - there is no help desk! So,
backups are definitely worthwhile. It's much
better to put in a little effort up front, so
that there is no need to worry if the unthinkable
really does happen. And, hard disk imaging, with
a program like True Image, makes the backup
process really quick and easy.
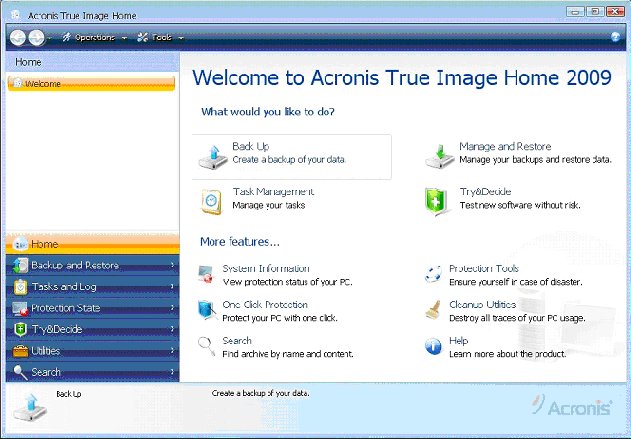
True Image Home 2009 is the latest release of
this venerable software package. It sports a
bright new look - and some new features. The main
menu has the look-and-feel of a web page, with
icons and text providing links to the main
program operations. In fact, there are multiple
paths to the program's tools since many of the
subsequent menu pages are inter-linked. There is
also a set of tabs on the left side of the page,
and two drop down menus at the top of the page,
that allow further navigation options.
All of these choices can be confusing initially,
but the program's bread and butter operations of
backup and restore are still front and centre. In
fact, the first option at the top of the
"home page" of the menu system is
Backup, closely followed by Manage and Restore.
In this version of True Image, the backup option
allows you to create a task to backup a complete
disk, a partition on a disk, or specific files or
folders on the disk. It will also let you save a
copy of just the system settings, the account
information and messages for selected E-mail
programs, and the settings for installed
applications. The manage and restore option
displays a list of backup image files and lets
you select one for processing. You can chose to
restore the whole disk, a single partition, or
specific files and folders available in the
image. There are lots of other options. But,
while the backup and restore options seem
endless, for most users the choices will be
simple - backup a whole disk, or perhaps just a
data partition - and restore the saved image to
its original location.
Selecting the
backup option provides a wizard that guides you
through the necessary steps to create a backup
task. In a simple scenario, you would select the
working disk for which an image is to be made.
The default on the next screen is to create a new
backup archive. Your option here would really be
to select a meaningful name for the image. The
default is MyBackup.tib which will not be very
informative when you have ten similarly-named
backup files. My practice is to use something
like d_datadrive_29jan09.tib where the date
specifies when the image of my data partition
(drive d:) was made. This file name format makes
it very easy to differentiate between multiple
backups of the same drive. Pressing the wizard's
Next button at this stage will allow you to skip
all further options and proceed to a summary
page, where your selections are displayed, prior
to you authorizing the backup to proceed
immediately.
Alternatively, you can go through a sequence of a
further six screens to specify more parameters.
These include whether the backup should be
unscheduled (i.e. run immediately on completion
of the wizard) or scheduled in some manner. The
scheduling system is extremely flexible. You can
set the backup to begin on a given date and time,
to run at a variety of regular intervals (e.g.
daily), or at the time of a certain event such as
at bootup. If using timed backups is your
preference, it's very unlikely that you won't be
able to set an appropriate schedule.
Having used previous versions of True Image, my
preference is to set up a backup process and then
run the backup immediately. True Image 2009 terms
this an unscheduled backup. However, I found a
bug in the program with this process. I set up an
unscheduled task for a backup of my data drive to
my external USB drive, and went straight to the
summary page where the "Run task now"
box was checked by default. I pressed the Proceed
button. The new task appeared in the unscheduled
tasks tab of the tasks and events log, but
nothing more happened. The backup didn't start.
True Image didn't issue an error message. The
task just sat there. Similarly, I could highlight
the task and press the Start button, but the task
still didn't start. As far as I can tell, such
unscheduled tasks will never start. But why?
I think the answer is that I am usually logged on
as a regular user in Vista, and Microsoft's
operating system, in its wisdom, is denying
access to the backup operation. If I log in on my
administrator's account, the unscheduled backup
task runs just fine. But, surely, there should be
at least a warning, or an error message, if I
tell True Image to do something and the command
is unable to complete.
I sent a query on this problem to the technical
support desk at Acronis, but only received an
automated E-mail response indicating "Please
do not submit your request more than once;
multiple submissions generate extra paperwork
that simply slows down response times."
After a month, I ignored the request and sent a
follow-up message. It took yet another month
before an E-mail from Acronis suggested that I
should "Right click on TrueImage.exe and
select Run as Administrator". Now this has
no effect, since it is always necessary to
provide authorization to Vista's User Account
Control in order to get True Image to run. Having
pointed this out, the second suggestion was a
link with which to update the Acronis Scheduler;
however, this too was remarkably unsuccessful.
So, the final stage was to refer the problem to
the "expert team". At the time of
writing, another three weeks have gone by and,
apparently, the expert team is still pondering
the question!
But, without waiting for an official response, it
turns out that the unscheduled backup problem
isn't a show stopper even for regular users.
Fortunately, there is a fairly simple workaround.
The trick is to create a scheduled backup, even
if it's only for a few minutes ahead of the
current time, by using the Scheduling - Once only
tab. This option includes an area where you can
enter a username and password to run the backup
"with credentials". You just need to
complete the password field as your username is
entered by default. You can then skip to the
summary tab, check the run task now box, press
the proceed button and, like magic, the backup
will start. It's odd that such a convoluted
strategy should be necessary, but it's actually
pretty simple to use in practice. And, it works!
So, creating a backup is no problem, or at least
not much of a problem. But, there is a major
problem when it comes to restoring an image. I
can't find any way that a regular Vista user can
get an image restored. The setup procedure for a
restore task has no options for scheduling, and
no options to enter a username and password. The
wizard will create the requested restore task
but, just as described above, the task won't
start! Not at all a useful system for a regular
user. So, it looks like you have to be logged on
as an administrator in order to run a restore
task in True Image 2009.
It's worth noting that this hasn't always been
the case with other versions of the product. I
routinely run True Image 10 under Vista to create
backups of full hard disks and data partitions,
and there have been a number of occasions when I
have had to restore one of the backup images.
These have always run properly for me, even
though I have been logged in as a regular user.
So, as I indicated earlier, I think this is a
bug. I can't find any mention of the problem in
the help files, or on the web site, but I find it
hard to believe that nobody has reported this
earlier.
The other thing to note is that this is a
Vista-specific problem. All of the above comments
relate to my Vista-based machine. I encounter
nothing like the same problems under Windows XP.
True Image 2009 runs just fine for an XP
administrator. For a regular XP user, attempting
to run the program produces the error message
"You do not have enough privileges to get
full access to all Acronis True Image Home
functionality". While this is perfectly
true, it turns out that you don't have enough
privileges to get access to any Acronis True
Image Home functionality. True Image 2009 just
won't run for a regular XP user! But, at least
it's honest about it. I guess the Vista
programmers at Acronis forgot to include this
message in their program module.
Anyway, if you are logged onto an administrator's
account, restoring any image is child's play. On
the main restore screen, you select an image from
the available backup files. A restore option in
the menu at the top of the window leads to a
wizard to guide you through the various restore
options. The simplest thing to do is to accept
the defaults to restore the associated files in
their original location and to retain all of the
stored files. You are then taken to a summary
page where you can review the selections and tell
the program to proceed with the restore
operation. The process then runs automatically,
and painlessly, with a progress bar showing the
degree of completion.
So, for the typical user, who runs their system
under an administrator's account, the processes
of disk backup and image restore are extremely
simple. They are also fairly rapid. True Image is
smart enough not to create physical backups of
empty sectors. The disk partition that holds my
operating system and applications is nominally
160GB, with 43GB in use. The backup image is
about 25GB and takes around 27 minutes to create.
My data partition is nominally 80GB with about
7GB of disk space in use. Backing up the full
data partition produces an image still close to
7GB, but takes only 6 minutes, as does a restore
process. And, my tests on small file structures
show that all of the restored files and folders
are identical to the originals. So, it would
appear that you really do get a true image.
But, not everyone wants to use such simple backup
strategies. So, for the more sophisticated user,
there are more sophisticated options available.
In addition to full backups of a disk partition,
True Image will also let you create a series of
incremental backups. The basic idea is that you
start by making a backup of the complete
partition. Subsequently, the first incremental
backup captures only the changes that have
occurred since the baseline image was made. The
second incremental backup captures the changes
after the first incremental backup and so forth.
Typically, you might create a baseline image at
the start of a week, and run only incremental
backups at the end of each day.
The series of files could then be used, for
example, on Thursday, to regenerate the disk
system as of Wednesday, by restoring Wednesday's
incremental backup. True Image would
automatically start with the baseline image, then
add Monday's increments, then Tuesday's, and
finally those from Wednesday. The advantage of
this system is that the incremental backups are
small and are created very quickly. The
disadvantage is that you end up with a host of
associated files although, as noted, the program
takes complete control of managing the restore
process. But, don't delete any of the incremental
backup files. If you break a link in the chain,
it will not be possible to recreate the disk to
any point after the last consecutive incremental
file.
There is also an option in True Image 2009 to
consolidate a set of backup files. Using this
tool, you could perform daily incremental backups
and then, at the end of the week, compact all of
the files into a single weekly backup image. But,
in this case, the option may only be marginally
useful. If you were to create such a regular
backup series, the next base image file would
reflect the system at a point one day later than
the consolidated image. So, saving the base image
files would effectively capture a series of
weekly backup images and obviate any need for
consolidation.
But, if short-term backups, processing times, and
storage space are issues for you, incremental
disk backups and consolidation may be a useful
alternative to making multiple full backups. A
slightly different variant on the incremental
backup process is termed differential backup. In
this case, each differential backup contains all
of the changes made since a baseline image was
created. Thus, in our daily backup scenario,
Wednesday's differential backup would contain all
the changes made on Monday, Tuesday and
Wednesday, following the baseline image made on
Monday morning. You would then only need two
files, the baseline image and one differential
image, to recreate the disk system at any given
point in time.
Some of the options for more complicated image
restoration are to specify a new location for the
files, to select only certain files and folders,
and whether or not to overwrite certain file
types (e.g. system files). It's also possible to
process the files in the stored image in other
ways. You can select an "Explore
backup" option that displays a directory
tree of the image file, and a list of the files
in any selected folder, just as if you were
browsing through a disk in Windows Explorer. You
can also choose to mount the selected image and
assign a drive letter, in which case it will
appear in Windows Explorer as a logical disk
drive. In either of these two cases, files and
folders can be copied directly from the image
onto your actual hard disk, so this is a very
convenient way of retrieving a single file or
folder without having to restore the entire image
file.
To keep track of all your operations, the
"Task Management" tab maintains lists
of both scheduled and unscheduled tasks that have
been set up, and a log of processes that have
occurred by date. Previously run tasks can be
easily edited so that, for example, the target
file name for a complete backup of a data
partition can be changed to include the current
date, and the task then rerun to create an
updated backup image. A calendar at the top of
the page shows the state of any scheduled backups
so that, for example, daily backups would be
shown as green on days when backups completed
successfully, or as red in the case where a
backup had failed for some reason. The log
entries for any given task provide details on the
various stages, and indicate the end result, so
this can be a very useful error tracking system.
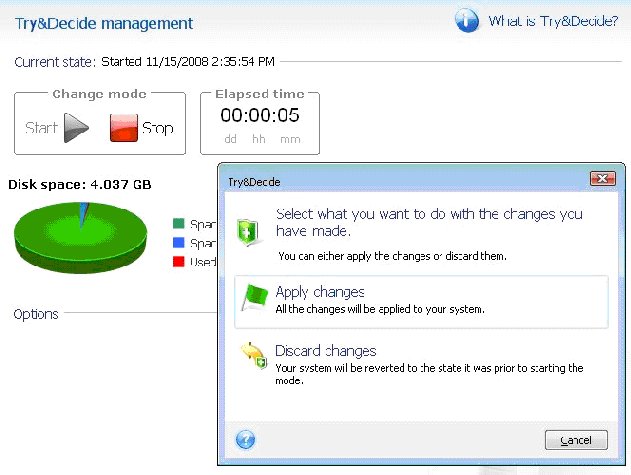
A really interesting feature of the program is
"Try&Decide". This lets you assign
an area of your hard disk as a "secure
zone". In fact, you must create a secure
zone in order to use this feature. If you press
the green start button before establishing a
secure zone, an error message will indicate that
the zone was not found. However, once you have
established a secure zone, and started
Try&Decide, the computer essentially goes
into a virtual operation mode. It appears to run
completely normally. You can install software,
run applications, and store files. However, when
you stop Try&Decide, a dialogue box asks if
you wish to apply the changes you have made to
your system, or if you would rather discard them.
Either way, the computer will be rebooted.
If you have installed new software and opted to
keep the changes, the new program will be
available after the reboot, just as if it had
been installed in regular fashion. On the other
hand, if you choose to discard the changes, once
the machine restarts, the trial installation and
any data files you produced are no longer present
since these only existed in the temporary
workspace of the secure zone. The documentation
that comes with True Image suggests other similar
uses for this virtual disk mode including reading
E-mail messages without being hit with attached
viruses, and even visiting web sites where the
content may be suspect.
Just don't let
yourself get distracted when testing something
new in the Try&Decide mode. If you also do
some work with a previously installed program,
create or modify some real files, and then decide
to discard the changes from your Try&Decide
session, both the trial software and your actual
work will be lost!
True Image offers a host of other tools,
including the ability to validate, update, or
remove backup image files, display the system's
protection status (current level of backup), and
change the size of the secure zone. There is also
a one-click protection feature that will easily
backup the system partition and master boot
record. If you upgrade from a small hard drive to
a much bigger disk, there are tools to copy files
between the two disks. If you are intending to
dispose of the smaller disk, you can securely
remove all the files from it before you do so. A
variant of this tool is a file shredder that will
destroy specific files and folders on a disk.
Similarly, using system clean-up, you can
securely destroy items in the recycle bin,
temporary files, your Internet browsing history,
etc. A search tool allows you to easily find
backup image files that you may have created on
various disk partitions.
There is an extremely comprehensive help system
covering every aspect of the program's
operations, and a variety of options allow you to
customize such things as the program's appearance
(display font) and the default options for both
backup and restore. A very important program
feature is that you can create a bootable rescue
disk with which to start your system and recover
a stored backup image in the event of a system
disk crash. But, note that the backup image must
be on a different physical disk than that which
crashed! You have to be able to read your backup
image. Keep multiple backups - in multiple
locations!
In summary, if you run your computer on an
administrator's account, True Image Home 2009
will provide an extremely capable backup and
recovery system for both your operating system
and data files. The program has many options for
backup and restore, and its other disk management
processes. In particular, True Image will let you
schedule backups on a regular basis, and save the
resulting images to external media. So, if you
are not too conscientious about making backups,
or are concerned about a potential crash of your
only hard drive, this package has the tools to
ensure regular backup of your important files and
storage of the backup files in a safe place. And,
as a member of OPCUG, you can purchase the
product at a very reasonable price
(
http://www.opcug.ca/promos.htm#UGR1.
So, what are you waiting for? Run that backup
process. Now!

Bottom Line:
True Image Home 2009
US $29 with User Group Discount
Acronis, Inc., Burlington, MA
http://www.acronis.com/
Originally published: June, 2009
top of page
|
Archived Reviews
A-J
K-Q
R-Z
The opinions expressed in these reviews
do not necessarily represent the views of the
Ottawa PC Users' Group or its members.
|
Sidebar
OPCUG members should be no strangers to True Image. It's the
software that we use to backup The Pub. And, club
members can purchase the program at a discount
through our good friends at
User Group Relations.
Chris Taylor reviewed True Image 8.0 in the
September, 2005 newsletter, and, most recently, Chris gave a hands-on
demonstration of various features of True Image
12 at the Members' Night held in May.
Chris recommends using two external disks in
rotation for image file storage, and keeping one
of these disks off site as a further safety
precaution against data loss (e.g. fire or
theft). He suggests making a full backup of the
entire system each month, followed by incremental
daily backups. This is the process used to backup
The Pub.
Once a month a full image of The Pub is taken,
then incremental backups are run on a daily
basis. Each month the last complete image set is
moved to a new, separate directory, allowing a
new full image snapshot to be taken the next day.
All images are created across the network onto an
external terabyte drive. Six months of backup
images are retained, using about 80 GB of space
on the external disk. With this method, any
specific file, or the complete system to any date
in the past six months, can be recovered.
|
|
