|
|
Building a Better Image
by Alan German
In today's world, digital cameras are all pervasive, and readily
produce hundreds of images. The problem is that, straight
out of the camera, the files have non-intuitive names,
such as IMG_0671.JPG and IMG_0672.JPG. So, we need to be
able to change these to something meaningful (to us),
like September_Vacation_001.jpg and
September_Vacation_002.jpg.
Now, renaming a couple of files is easy, but what do we
do if we have dozens, or perhaps hundreds, of images that
we need to deal with? Clearly we need a batch file
renamer. How about using – Batch File Renamer –
a utility program from Ezyware Software? The program's
About box indicates that you can rename or reset the
attributes on up to one million files. Do you have a
problem now?
Using the program is really easy. Just download and run
the executable BatchFileRenamer.exe. It needs no
installation. There is also no help file, but using the
program is fairly intuitive. One caveat. There is no
means to select a subset of files to rename within the
program. Consequently, you need to arrange to have the
specific group of files that you wish to rename in a
given directory.
Once your directory of choice is established, you simply
browse to the Source Directory of Files. Then, in the box
marked Generate Destination File Names, replace the
default “myFilename#” text with the file name
of your choice.
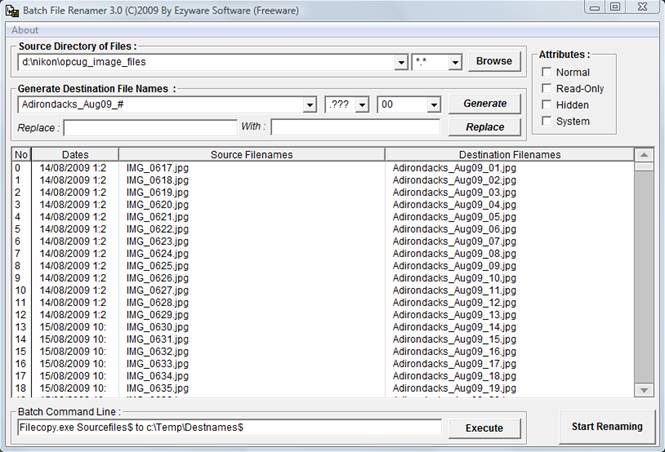
Make sure
that you leave the # sign in place, since this will
generate the numerical sequence on the renamed files.
Note that, in the example shown, the files are to be
renamed as Adirondacks_Aug09_# in order to produce images
named Adirondacks_Aug09_01, Adirondacks_Aug09_02, etc.
A drop-down menu for the file extension is initially set
as .??? Leaving this setting retains the existing file
extension which, for example, may be .JPG. Using the
drop-down menu provides the option to create the file
extension as .jpg, .png, .gif, .doc or .mp3. While this
latter process creates a file extension in lower case, if
you really want an upper case JPG, you can always use the
Replace function later.
The next box displays a 0 by default, with a drop-down
menu offering 00, 000, etc. options. This sets the format
for the file numbering sequence. Numbering always starts
at 1 but, if you choose the 00 formatting option, the
numbers in the file names will appear in as 01, 02, etc.
Note that this was the format selected in our example
(i.e. Adirondacks_Aug09_01.jpg.)
You can preview the file names and extensions that will
be created by clicking on the Generate button. If the new
file names and extensions are going to be created just as
you intended, click on the Start Renaming button in the
lower-right corner of the window and – bingo! –
all of your files now have new, and meaningful names.
The Replace function works similarly. Select a portion of
the file name or extension to be modified and type this
into the Replace box. In the next box (named With), type
the text string that you would like to see instead. Click
on the Replace button to see a preview, and click on
Start Renaming to run the search and replace function.
There is also a Batch Command Line box in the lower-left
corner of the program's window. By default, this contains
the text Filecopy.exe Sourcefiles$ to c:\Temp\Destnames$
with an associated Execute button. I'm not sure what this
does, or what this box is really intended to do, and I
haven't been brave enough to try. Good luck if you do!
[OK – you're right – I couldn't resist hitting
the Execute button. But, all I got for my trouble was the
error message “Drive or File Error
Encountered”.]
The only other selection box, marked Attributes, is in
the top-right corner of the display window. This lets you
set the file attributes as Normal, Read-Only, Hidden or
System.
So, once you figure out how the program works, or at
least how its main functions operate, Batch File Renamer
does precisely what its name suggests, and does it very
well. And, since it is freeware, it's well worth having
this tool available for your digital image processing.
So, now we have dozens of files, all with understandable
names. The next problem is that we would like to share
some of these with our friends and relatives – but
each of the files is 2-3 MB (or more) – which
severely restricts how many can be sent by E-mail, and
perhaps how many we can post to our limited web server
space. What we need is an image resizer. (And, three
guesses what our next utility is called!)
A completely different, but still completely free
utility, that is a useful addition to your digital image
toolbox is Image Resizer, one of the Microsoft Powertoys
for XP. As its name suggests, this program was written
for Windows XP. But, Vista users should not despair. A
clone – the aptly named Image Resizer PowerToy Clone
for Windows – is available from Sourceforge,
released under the Open Source Initiative's Common Public
License Version 1.0.
The clone works in the precisely same manner as its XP
counterpart, but will also run under Vista and Windows 7,
including the 64-bit versions of these operating systems.
Since I am currently using 32-bit Vista as my Windows'
platform, it is the operation of the associated clone
that I will describe here.
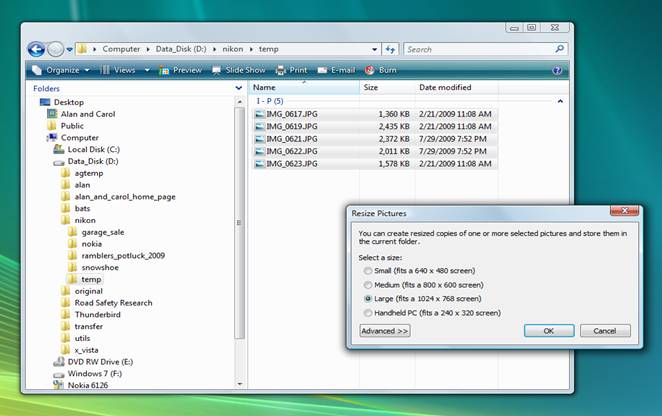
The program is downloaded as an MSI file and hence needs
to be installed before it can be used. Installation
causes the utility to be hooked into Windows Explorer. It
is then accessed by selecting one or more files,
right-clicking, and choosing Resize Pictures. This opens
up a dialogue box with a number of options.
In the program's basic operation mode, a series of radio
buttons provide pre-set sizes for the images, ranging
from Large (1024 x 768 pixels) to Handheld PC (240 x 320
pixels). Select one of these sizes, click OK, and a
number of new, smaller files are created, with names like
IMG_0617 (Small).JPG. In this mode, the original images
files are left intact.
Clicking on
the Advanced button provides a number of further options.
Firstly, you can obtain custom sizing by specifying the
width and height of the resized images in pixels.
Secondly, two check boxes allow you to select options to
“Make pictures smaller but not larger” and
“Resize the original pictures (don't create
copies)”.
The program is simple to use yet quite versatile. In
particular, the ability to resize the images while
retaining the original file name is highly desirable
– for those of us who like clean naming conventions
– and for those of us who backup our originals
before modifying the pictures!
Custom image file names and custom image sizes. And, all
for free. These two little utilities just have to find a
place in your file management toolbox.
Bottom Line:
Batch File Renamer (Freeware)
Version 3.0
Ezyware Software
http://www.ezyware.com/
Image Resizer PowerToy Clone for Windows (Open Source)
Version 2.0
Brice Lambson
http://www.codeplex.com/PhotoToysClone
Image Resizer - Microsoft PowerToys for Windows XP (Freeware)
Microsoft Corporation
http://www.microsoft.com/windowsxp/downloads/powertoys/xppowertoys.mspx
Originally published: November, 2009
top of page
|
Archived Reviews
A-J
K-Q
R-Z
The opinions expressed in these reviews
do not necessarily represent the views of the
Ottawa PC Users' Group or its members.
|
